World's simplest online image to stamp converter. Just upload an image in the editor on the left, select the stamp area and adjust the visual stamp settings, and you'll instantly get a digital PNG stamp on the right. In the tool options, you can control the level of stamp detail, simulate wear and rotation, add borders, and customize colors and background transparency. Free, quick, and very powerful. Created with love by team Browserling.
World's simplest online image to stamp converter. Just upload an image in the editor on the left, select the stamp area and adjust the visual stamp settings, and you'll instantly get a digital PNG stamp on the right. In the tool options, you can control the level of stamp detail, simulate wear and rotation, add borders, and customize colors and background transparency. Free, quick, and very powerful. Created with love by team Browserling.

This browser-based utility converts any image (like a photo, logo, or icon) into a cool, stylized stamp or seal. It takes your file (in PNG, JPG, GIF, or other format) and turns it into a simplified monochrome design that resembles real ink stamps. The output stamp has the PNG format, which supports transparency, so you can use the stamp in electronic documents (like PDF or Word), certificates, or creative design projects. The tool offers a dozen options that let you control the stamp's shape, quality, texture, and color. You can even make it look like a silhouette or stencil, depending on how much detail you select. To begin, upload your image in the input editor and choose the area in the image that will become the stamp. You can choose either a rectangular/square or circular/round stamp shape and crop that shape out of the input image. The cropping area can be adjusted in the input editor using the mouse and draggers or through four numerical parameters in the options: horizontal offset (X), vertical offset (Y), width, and height. The horizontal and vertical offsets can be negative, allowing the cropping area to go outside of the image. Similarly, the width and height can be larger than the height of the image, allowing you to precisely define the shape and size of the stamp. If you choose a rectangular stamp shape, you can round the corners to achieve a smoother, softer stamp design. The padding option allows you to add extra space around the outer edges of the stamp, which helps avoid clipping and keeps it from touching the nearby content. Additionally, it makes it easier to position the stamp in documents. Once the area is selected, you can customize the visual style of the stamp. Use the "Light Match Precision" setting to control how the image is converted into a two-tone stamp. If you keep it at 100% (default value), you'll get a balanced light/dark effect. If you reduce it (below 100%), you can emphasize shadows. If you increase it (above 100%), you can highlight brighter areas. For additional detail, you can enable the dithering effect (also known as the dot printing effect). It creates patterns using ink dots of varying density, helping to convey shapes, textures, and light/dark transitions. You can choose from several dithering algorithms, including "Floyd Steinberg", "Atkinson", "Stucki", "Sierra", and many others. You can use the "Stamp Quality" option to simulate ink wear and make it look more realistic. Lowering the quality below 100% adds intentional stamp imperfections, such as missing and faded ink spots, mimicking how a real stamp looks after a few uses. You can also rotate the stamp at any angle. Use positive degree values to rotate counterclockwise and negative values to rotate clockwise. To complete the design, enable the stamp border option. This feature adds an outline around the stamp that matches the cropped shape (rectangular or oval). You can choose from several border styles, including plain (simple, solid line), wavy (ripple-like edge), spiked (edge with sharp points), or even star-shaped (many stars going around the perimeter). You can also adjust the border's thickness and color. Finally, you can customize the color of the stamp itself and choose a background color (to make the background transparent, enter "transparent"). You can also adjust the stamp's opacity to make the output PNG image slightly translucent, allowing any text below it to show through. If you'd like to create a stamp from а custom text (such as a word, number, or phrase), try our Create a Stamp from Text tool. You can also make fun and expressive stamps from Unicode emojis using our Create an Emoji Stamp tool. Png-abulous!
This browser-based utility converts any image (like a photo, logo, or icon) into a cool, stylized stamp or seal. It takes your file (in PNG, JPG, GIF, or other format) and turns it into a simplified monochrome design that resembles real ink stamps. The output stamp has the PNG format, which supports transparency, so you can use the stamp in electronic documents (like PDF or Word), certificates, or creative design projects. The tool offers a dozen options that let you control the stamp's shape, quality, texture, and color. You can even make it look like a silhouette or stencil, depending on how much detail you select. To begin, upload your image in the input editor and choose the area in the image that will become the stamp. You can choose either a rectangular/square or circular/round stamp shape and crop that shape out of the input image. The cropping area can be adjusted in the input editor using the mouse and draggers or through four numerical parameters in the options: horizontal offset (X), vertical offset (Y), width, and height. The horizontal and vertical offsets can be negative, allowing the cropping area to go outside of the image. Similarly, the width and height can be larger than the height of the image, allowing you to precisely define the shape and size of the stamp. If you choose a rectangular stamp shape, you can round the corners to achieve a smoother, softer stamp design. The padding option allows you to add extra space around the outer edges of the stamp, which helps avoid clipping and keeps it from touching the nearby content. Additionally, it makes it easier to position the stamp in documents. Once the area is selected, you can customize the visual style of the stamp. Use the "Light Match Precision" setting to control how the image is converted into a two-tone stamp. If you keep it at 100% (default value), you'll get a balanced light/dark effect. If you reduce it (below 100%), you can emphasize shadows. If you increase it (above 100%), you can highlight brighter areas. For additional detail, you can enable the dithering effect (also known as the dot printing effect). It creates patterns using ink dots of varying density, helping to convey shapes, textures, and light/dark transitions. You can choose from several dithering algorithms, including "Floyd Steinberg", "Atkinson", "Stucki", "Sierra", and many others. You can use the "Stamp Quality" option to simulate ink wear and make it look more realistic. Lowering the quality below 100% adds intentional stamp imperfections, such as missing and faded ink spots, mimicking how a real stamp looks after a few uses. You can also rotate the stamp at any angle. Use positive degree values to rotate counterclockwise and negative values to rotate clockwise. To complete the design, enable the stamp border option. This feature adds an outline around the stamp that matches the cropped shape (rectangular or oval). You can choose from several border styles, including plain (simple, solid line), wavy (ripple-like edge), spiked (edge with sharp points), or even star-shaped (many stars going around the perimeter). You can also adjust the border's thickness and color. Finally, you can customize the color of the stamp itself and choose a background color (to make the background transparent, enter "transparent"). You can also adjust the stamp's opacity to make the output PNG image slightly translucent, allowing any text below it to show through. If you'd like to create a stamp from а custom text (such as a word, number, or phrase), try our Create a Stamp from Text tool. You can also make fun and expressive stamps from Unicode emojis using our Create an Emoji Stamp tool. Png-abulous!
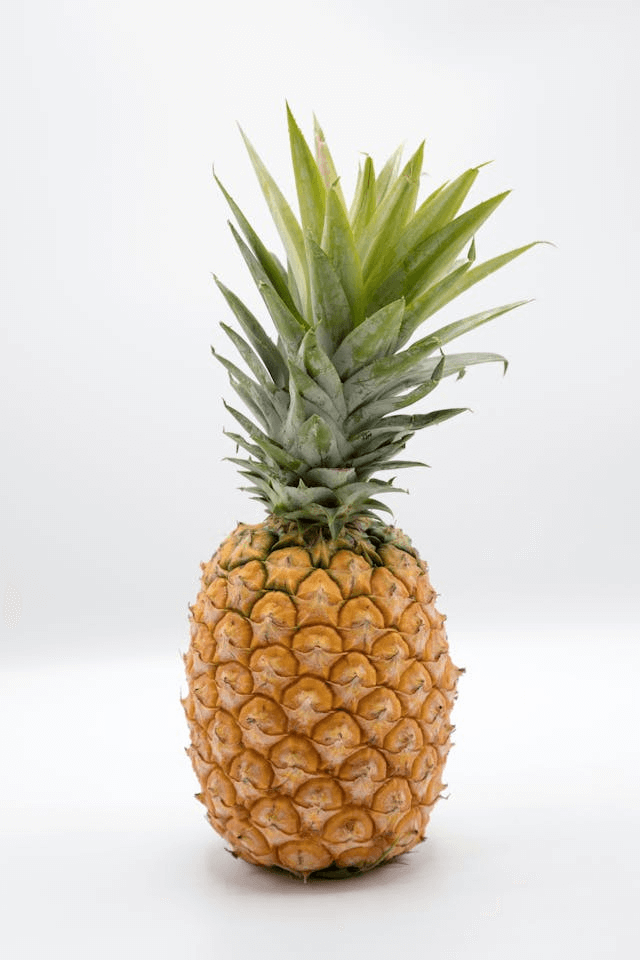
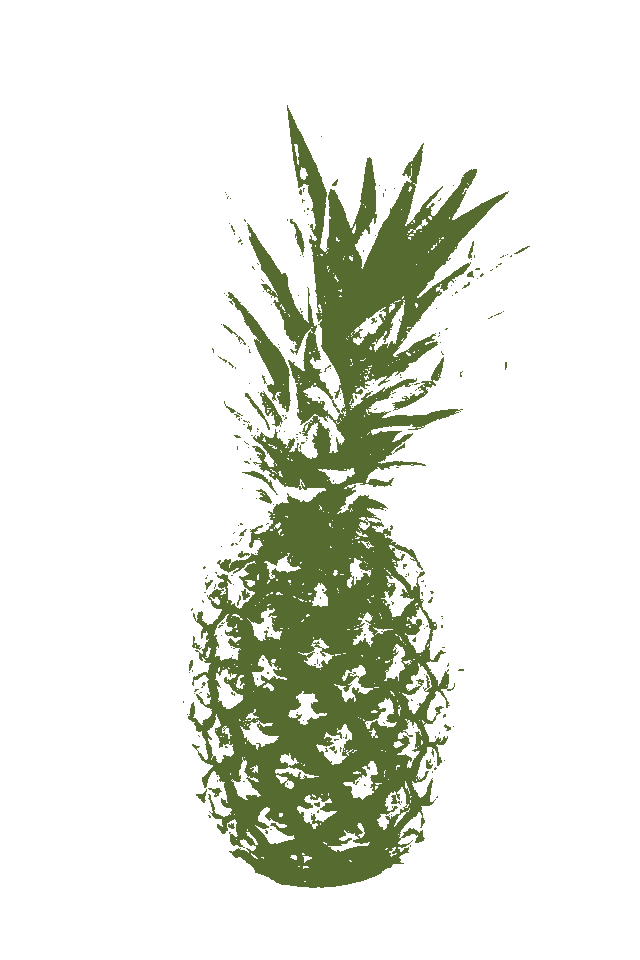
In this example, we convert a PNG photo of a pineapple into a single-color stencil-like stamp. We select the "Rectangular Crop" mode and place the crop area over the entire photo, creating a stamp of the same size as the input. To preserve maximum detail, we increase the light match precision to 145%, which emphasizes lighter pixels and discards shadows. For the stamp's color, we select the pineapple crown's color (dark-olive-green). The result is a clean and detailed pineapple imprint without a border. (Source: Pexels.)
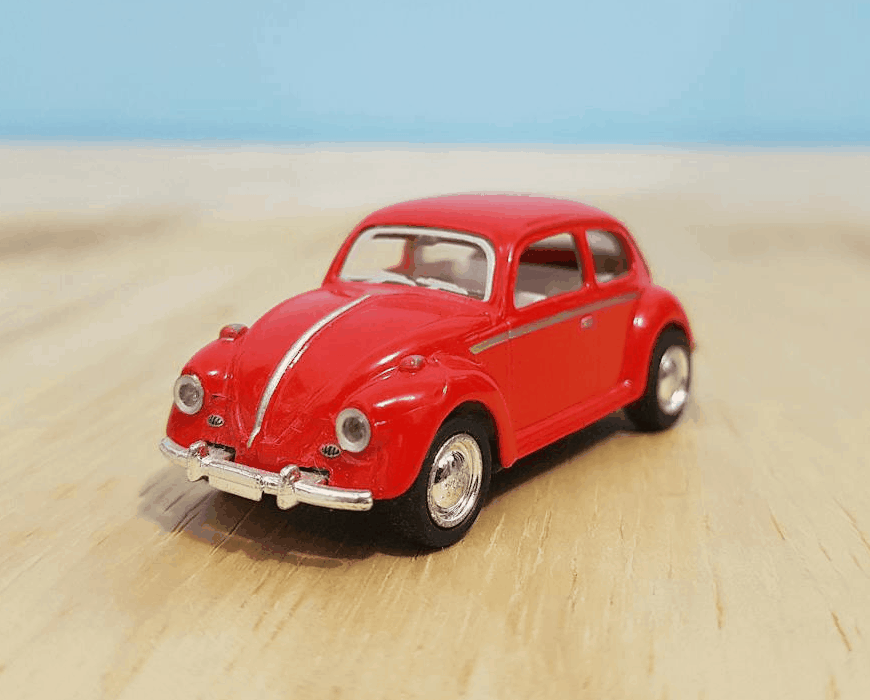
This example turns a single-frame, static GIF image of a red Volkswagen Beetle into a stamp resembling a postage mark. It tightly crops the image around the car, sets a rectangular shape, and adds a bold black spiky border around it. The stamp is colored black and its quality is reduced to 70%, giving it a slightly worn, imperfectly inked appearance. (Source: Pexels.)

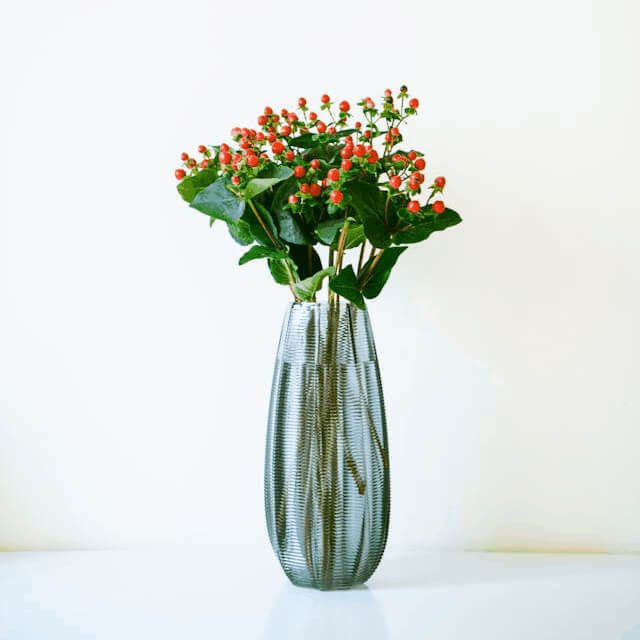
In this example, we create a decorative stamp from a JPG photo of a flower vase. We switch to the circular cropping mode and select a round 600×600 pixel area of the JPG. To preserve the maximum artistic detail and texture, we enable the dithering option using the Atkinson's method. Around the border, we add an extra 20 pixels of padding, giving the edges some space. Additionally, we style the stamp with two colors – dark green for the vase and flowers and dark blue for the circular border. (Source: Pexels.)

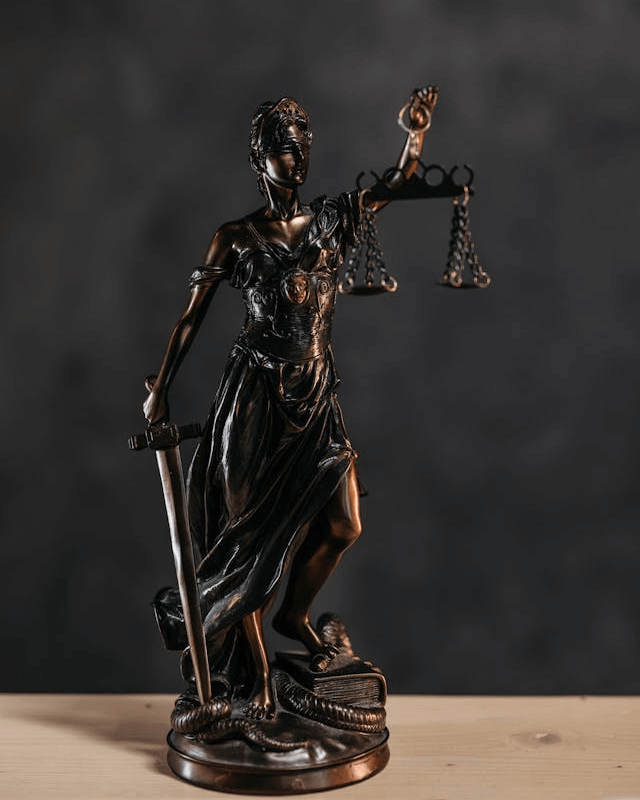
This example transforms an image of the Lady Justice statue into a professional-looking stamp. The stamp's design features a practical circular shape and is decorated with a black border made of a sequence of stars. The interior of the stamp contains a simplified version of the statue, also painted in black color. This stamp is well-suited for use by law firms, notaries, or legal departments aiming to reflect the values of justice and law in their branding. (Source: Pexels.)

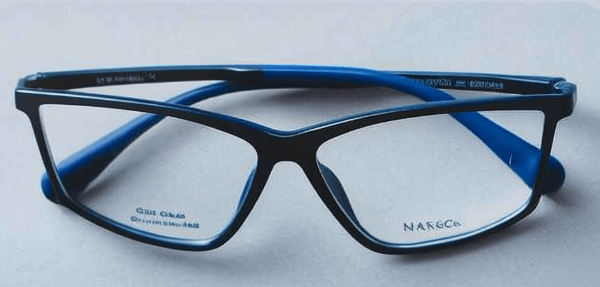
In this example, we design a monochrome logo stamp for an eyewear company using a PNG image of glasses that they sent us. To give the stamp an oval shape, we make the crop area in the input editor extend beyond the original image boundaries. The width and height of the stamp is set to 680 and 410 pixels (larger than the given PNG image) and the x-offset and y-offset values are set to negative values of -40 and -64. We increase the light pixel threshold to a high value of 170%, which makes sure the shadows and dark edges are discarded. For the border, we choose a wavy border with a width of 25 pixels. Additionally, we change the stamp quality to 85%, which creates some ink imperfections, and draw the stamp in dark blue color. (Source: Pexels.)
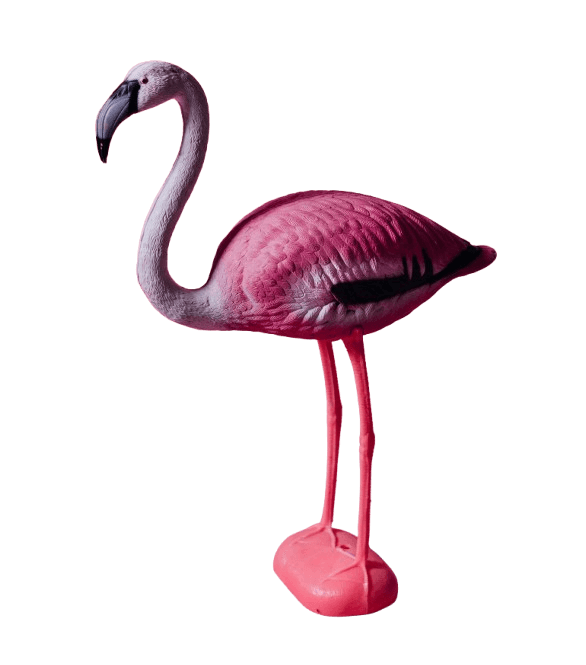
This example converts a multi-color PNG sticker (PNG image with a transparent background) of a flamingo into a single-color stamp featuring only the silhouette of the same flamingo, painted in a medium violet color. To do it, the tool essentially splits the image into two parts: the transparent background of the stamp becomes the stamp background, while the opaque areas of the flamingo form the stamp impression. The stamp has a rectangular shape with rounded corners (the corner radius value is set to 200px). Additionally, the stamp has a low quality of 60% (meaning it simulates an old stamp with many defects) and it's rotated by -10 degrees (clockwise). (Source: Pexels.)

Edit a PNG in your browser.
Compare two or more PNG images.
Convert a PNG image to an AV1 image (AVIF).
Convert an AV1 image (AVIF) to a PNG image.
Convert a PNG image to a High Efficiency Image File (HEIF).
Convert a Hide Efficiency Image File (HEIF) to a PNG image.
Convert a PNG image to an ICO icon.
Convert a PNG image to a TIFF image.
Convert a TIFF image to a PNG image.
Convert a PNG image to a PIK image.
Convert a PIK image to a PNG image.
Convert a PNG image to a PPM image.
Convert a PPM image to a PNG image.
Convert a PNG image to a BPG image.
Convert a BPG image to a PNG image.
Convert a PNG image to a FLIF image.
Convert a FLIF image to a PNG image.
Convert a PNG image to a Paint.net file.
Convert a Paint.net file to a PNG image.
Convert a PNG image to a Photoshop file.
Convert a Photoshop file to a PNG image.
Convert a PNG image to an SVG image.
Convert a PNG image to an PDF document.
Convert a PDF document to a PNG image (or multiple images).
Convert a PNG image to an EPS file.
Convert an EPS file to a PNG image (or multiple images).
Convert a PNG image to a JFIF image.
Convert a JFIF image to a PNG image.
Convert a PNG image to raw RGB values.
Convert RGB values to a PNG image.
Convert a PNG image to raw BGR values.
Convert BGR values to a PNG image.
Convert a PNG image to raw RGBA values.
Convert RGBA values to a PNG image.
Convert a PNG image to raw BGRA values.
Convert BGRA values to a PNG image.
Convert multiple PNGs to a GIF animation.
Convert an APNG animation to a GIF image.
Convert a GIF animation to an APNG image.
Convert an APNG image to a Webp image.
Convert a Webp image to an APNG image.
Convert an APNG image to an MP4 video.
Convert an MP4 video to an APNG image.
Convert an APNG image to an AVI video.
Convert an AVI video to an APNG image.
Convert an APNG image to a WMV video.
Convert an WMV video to an APNG image.
Extract all frames from an APNG image.
Play a PNG animation (APNG) frame by frame.
Change the playback speed of an animated PNG (APNG).
Change how many times an animated PNG loops.
Reverse the order of frames in an animated PNG (APNG).
Created animated PNGs (APNGs) from input images.
Check if the given PNG file is an animated PNG file (APNG).
Create a sprite sheet from all animated PNG (APNG) frames.
Create an animated PNG (APNG) from a sprite sheet.
Create Excel art from a PNG image.
Break a PNG image into multiple pieces.
Generate a slideshow animation from multiple PNGs.
Generate a mosaic wall from multiple PNGs.
Convert a PNG into a hexagonal grid of pixels.
Convert a PNG into a triangular grid of pixels.
Create a Voronoi diagram from a PNG image.
Darken PNG corners compared to its center.
Create multiple reflections of a PNG.
Apply a Bayer filter on a PNG.
Make a PNG look like it was taken via night vision goggles.
Make a PNG look like it's spherical.
Run a PNG through the Mobius Transform.
Convert between RGB, CMYK, HSV, and HSL color spaces.
Convert between 8-bit, 16-bit, 24-bit, and 32-bit PNG depths.
Remove dithering from a PNG image.
Convert a PNG to an ASCII art image.
Convert ASCII art to a PNG image.
Convert a PNG to an ANSI art image.
Convert ANSI art to a PNG image.
Convert a PNG to a Braille art image.
Convert Braille art to a PNG image.
Create a PNG image from the given bytes.
Convert a PNG image to bytes.
Increase the quality of a PNG image.
Extract a 2d slice from a PNG.
Create a PNG that contains all possible RGB colors.
Find all textual information in a PNG image and extract it.
Given any 2D PNG, add 3rd dimension to it.
Quickly erase text (labels, captions) from a PNG.
Quickly delete a watermark from a PNG.
Salvage a PNG that has bad bytes in it and doesn't open.
Conceal a secret message in a PNG image.
Update meta data of a PNG file.
Delete meta data from a PNG picture.
Check if the given file is a valid PNG without errors.
Subscribe to our updates. We'll let you know when we release new tools and features, and when we organize online workshops.
Enter your email here
We're Browserling — a friendly and fun cross-browser testing company powered by alien technology. At Browserling we love to make people's lives easier, so we created this collection of online PNG tools. We created the simplest possible user interface for our tools and they are now used by millions of users every month. Behind the scenes, our online PNG tools are actually powered by our web developer tools that we created over the last couple of years. Check them out!