World's simplest online JPG photo to stamp converter. Just upload your JPG file in the editor on the left, select the region or object in the JPG using the interactive draggers, and you'll instantly get a two-tone PNG stamp of the object on the right. In the tool options, you can adjust how detailed the selected object appears in the stamp, rotate the stamp clockwise and counterclockwise, add a border around the stamp, and select the colors for the object in the stamp and the background. Free, quick, and very powerful. Import a JPG – get a stamp. Created with love by team Browserling.
World's simplest online JPG photo to stamp converter. Just upload your JPG file in the editor on the left, select the region or object in the JPG using the interactive draggers, and you'll instantly get a two-tone PNG stamp of the object on the right. In the tool options, you can adjust how detailed the selected object appears in the stamp, rotate the stamp clockwise and counterclockwise, add a border around the stamp, and select the colors for the object in the stamp and the background. Free, quick, and very powerful. Import a JPG – get a stamp. Created with love by team Browserling.

This browser-based utility converts JPEG pictures into realistic digital PNG stamps and seals. It takes your standard JPEG picture (from a phone or camera) and transforms it into a stylized one-tone or two-tone graphics design that looks a lot like a physical rubber stamp. Stamps generated from JPEG files can be used in a bunch of ways. People use them to create personalized watermarks that can be pasted on digital documents and photos so others don't copy their work. They are also handy for making basic digital logo-like stamps that can be applied to packaging or presentations. Even more use cases include decorating greeting cards and business cards. If you need to quickly generate a more advanced stamp design, such as a text-based stamp or emoji-based stamp, check out our Create a Stamp from Text and Create an Emoji Stamp tools. Here are the steps you need to take to generate a digital stamp imprint. First, select an area in your input JPEG picture that covers the object that you want to convert into a stamp. You can choose one of the base shapes – either a rectangular or oval shape. You can precisely set the position and dimensions of the shape either by adjusting the dimension parameters in the options (left offset, top offset, width, and height) or by resizing and relocating the shape with your mouse in the input editor. Rectangular stamps can also have rounded corners, which are created by specifying a corner radius in pixels. To create a square stamp, set the width equal to the height. Similarly, to create a circular stamp, set the width equal to the height as well. A key setting for achieving the two-color effect is the tonal balance, which modifies the details in the stamp's imprint depending on the amount of lightness and darkness in JPEG pixels. The default value for this setting is 100%, with a possible range from 0% to 200%. A tonal balance of less than 100% will select more darker pixels, while a tonal balance of more than 100% will select more lighter pixels. Additionally, you can activate a dithering effect, which replicates the texture of the real impression using individual scattered pixels, giving the stamp's imprint a grainy appearance. If dithering is enabled, you can choose from several pixel-scattering algorithms (such as Atkinson, Stucki, Sierra, and others). Each algorithm produces a unique pixel pattern, so experiment with them to see which you like the most. The quality setting simulates the realism of an actual rubber stamp. A value of 100% results in a crisp, fully inked imprint. Lowering this value introduces gaps and inconsistencies, as though the stamp lacked sufficient ink or was unevenly pressed. You can rotate your imprint by a specified number of degrees and also add space around the resulting stamp using padding. Another extra option allows you to add a border around the stamp. The border's shape will automatically match the selected JPEG shape (rectangular or oval). Here, you can define the border's width in pixels, specify its color, and select a style (simple solid border, border made out of waves, border made out of spikes, or border made out of stars). Furthermore, you can assign custom colors for both the imprint and the background. By default, the stamp is transparent, but you can fill the background with any color. Optionally, the stamp can be made see-through by reducing its opacity from 100% to a lower value. Png-abulous!
This browser-based utility converts JPEG pictures into realistic digital PNG stamps and seals. It takes your standard JPEG picture (from a phone or camera) and transforms it into a stylized one-tone or two-tone graphics design that looks a lot like a physical rubber stamp. Stamps generated from JPEG files can be used in a bunch of ways. People use them to create personalized watermarks that can be pasted on digital documents and photos so others don't copy their work. They are also handy for making basic digital logo-like stamps that can be applied to packaging or presentations. Even more use cases include decorating greeting cards and business cards. If you need to quickly generate a more advanced stamp design, such as a text-based stamp or emoji-based stamp, check out our Create a Stamp from Text and Create an Emoji Stamp tools. Here are the steps you need to take to generate a digital stamp imprint. First, select an area in your input JPEG picture that covers the object that you want to convert into a stamp. You can choose one of the base shapes – either a rectangular or oval shape. You can precisely set the position and dimensions of the shape either by adjusting the dimension parameters in the options (left offset, top offset, width, and height) or by resizing and relocating the shape with your mouse in the input editor. Rectangular stamps can also have rounded corners, which are created by specifying a corner radius in pixels. To create a square stamp, set the width equal to the height. Similarly, to create a circular stamp, set the width equal to the height as well. A key setting for achieving the two-color effect is the tonal balance, which modifies the details in the stamp's imprint depending on the amount of lightness and darkness in JPEG pixels. The default value for this setting is 100%, with a possible range from 0% to 200%. A tonal balance of less than 100% will select more darker pixels, while a tonal balance of more than 100% will select more lighter pixels. Additionally, you can activate a dithering effect, which replicates the texture of the real impression using individual scattered pixels, giving the stamp's imprint a grainy appearance. If dithering is enabled, you can choose from several pixel-scattering algorithms (such as Atkinson, Stucki, Sierra, and others). Each algorithm produces a unique pixel pattern, so experiment with them to see which you like the most. The quality setting simulates the realism of an actual rubber stamp. A value of 100% results in a crisp, fully inked imprint. Lowering this value introduces gaps and inconsistencies, as though the stamp lacked sufficient ink or was unevenly pressed. You can rotate your imprint by a specified number of degrees and also add space around the resulting stamp using padding. Another extra option allows you to add a border around the stamp. The border's shape will automatically match the selected JPEG shape (rectangular or oval). Here, you can define the border's width in pixels, specify its color, and select a style (simple solid border, border made out of waves, border made out of spikes, or border made out of stars). Furthermore, you can assign custom colors for both the imprint and the background. By default, the stamp is transparent, but you can fill the background with any color. Optionally, the stamp can be made see-through by reducing its opacity from 100% to a lower value. Png-abulous!
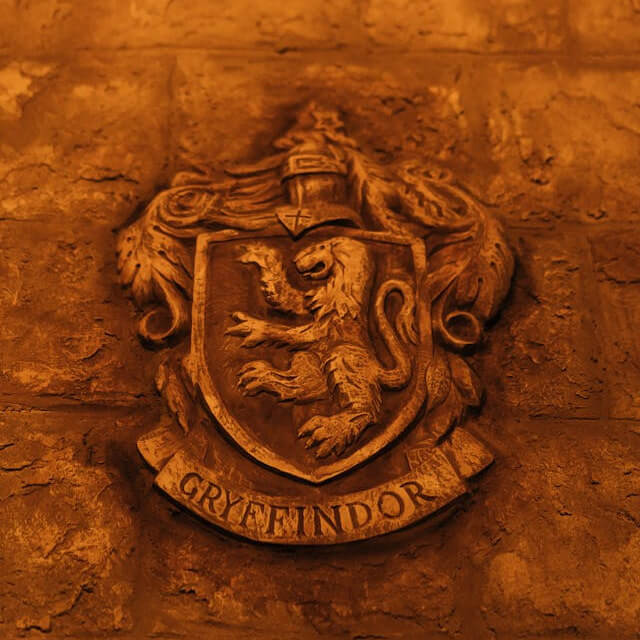
In this example, we create a round stamp from the Gryffindor crest (in JPEG format) for decorating Harry Potter-themed party invitations. To do it, we cut a circular portion with the emblem out of the JPEG, apply a see-through (transparent) background, and use a solid black color for both the stamp imprint and the border around it. The stamp is surrounded by a simple circle frame, which blends with the emblem. There's also a 10-pixel outer padding around it to give it more visual space when it's applied on the invitation cards. (Source: Pexels.)

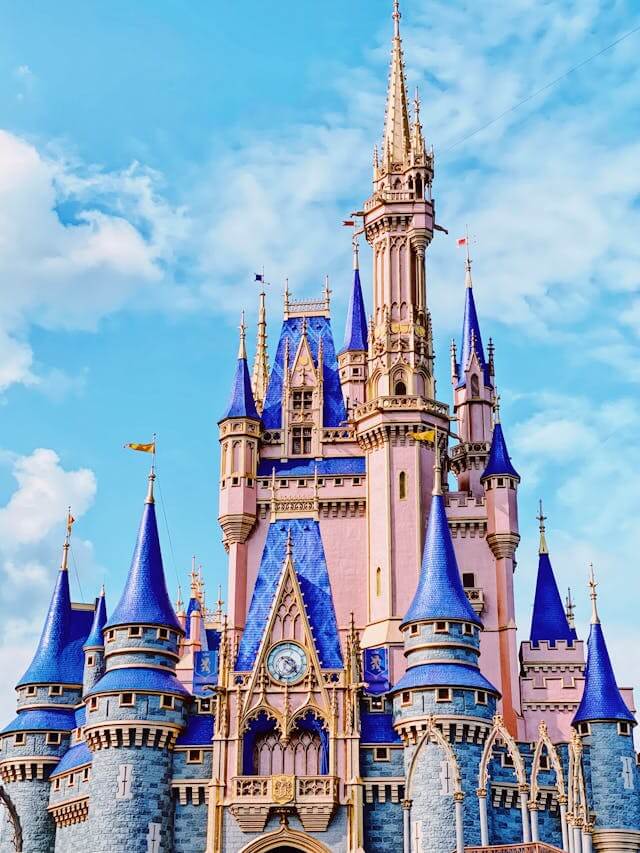
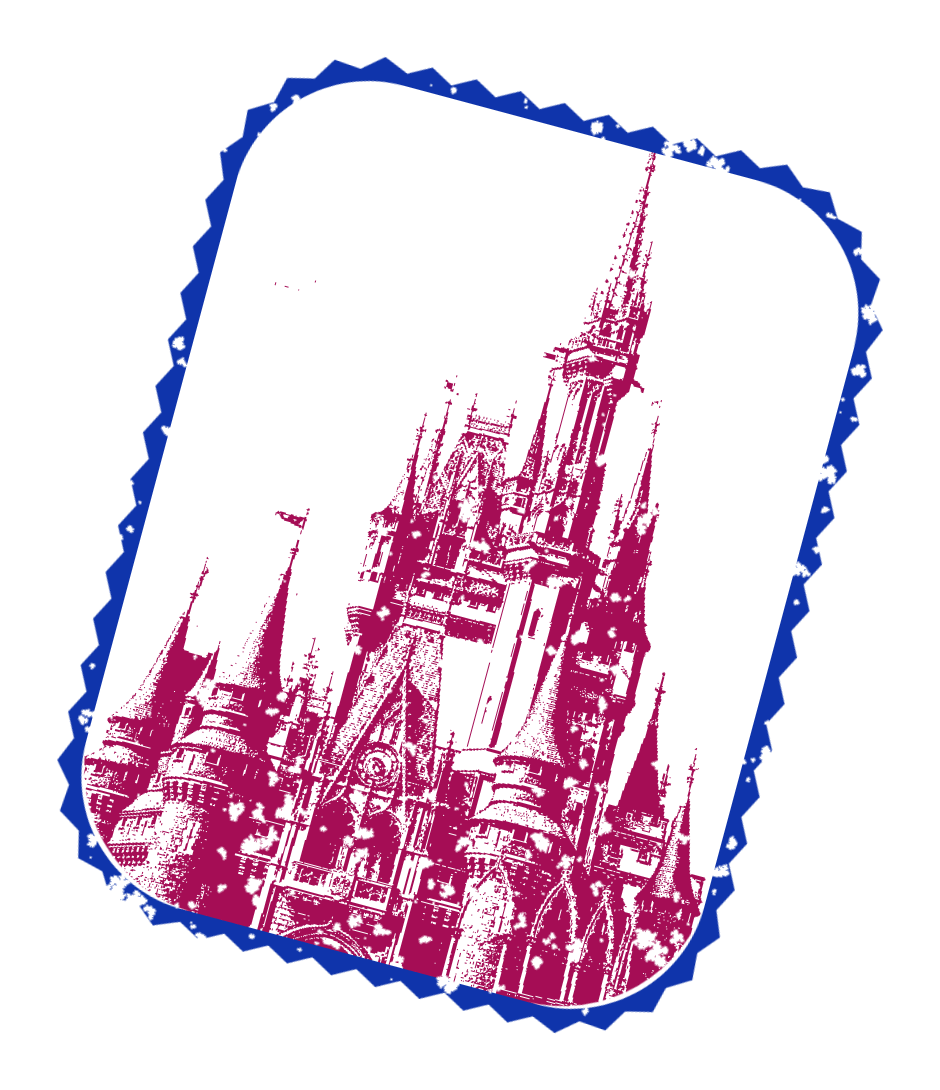
This example transforms a JPG photo of the Disney castle into a decorative rectangular seal with rounded corners. It reduces the tonal detail of the castle to 40% to enhance the shadows and darker parts of the castle, adds a 25-pixel spiky border, and slightly rotates the imprint to the right by -15° (clockwise). The seal quality is set to 50% to simulate an imperfect ink impression. Rich magenta and dark blue tones are used to create an eye-catching design. This seal can serve as a memorable souvenir for Disneyland visitors. (Source: Pexels.)
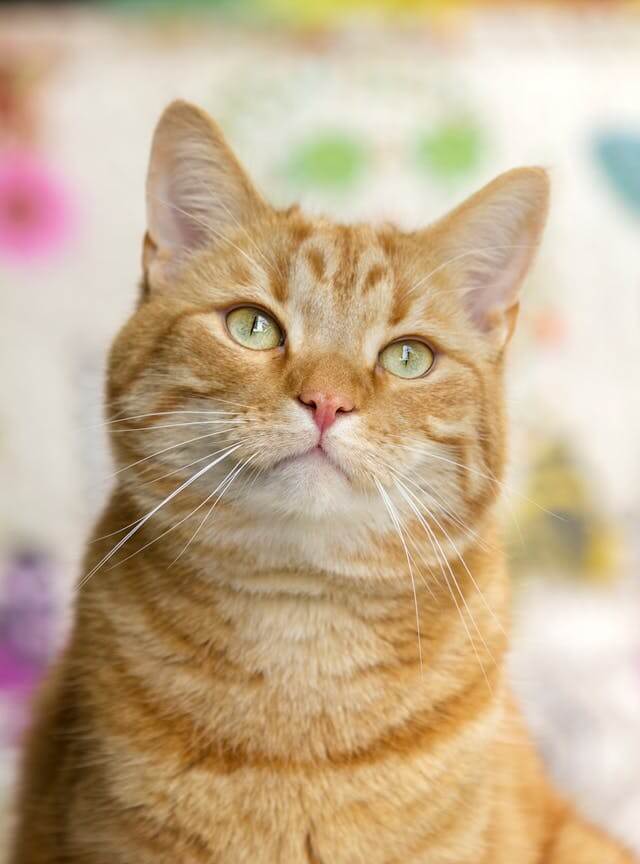
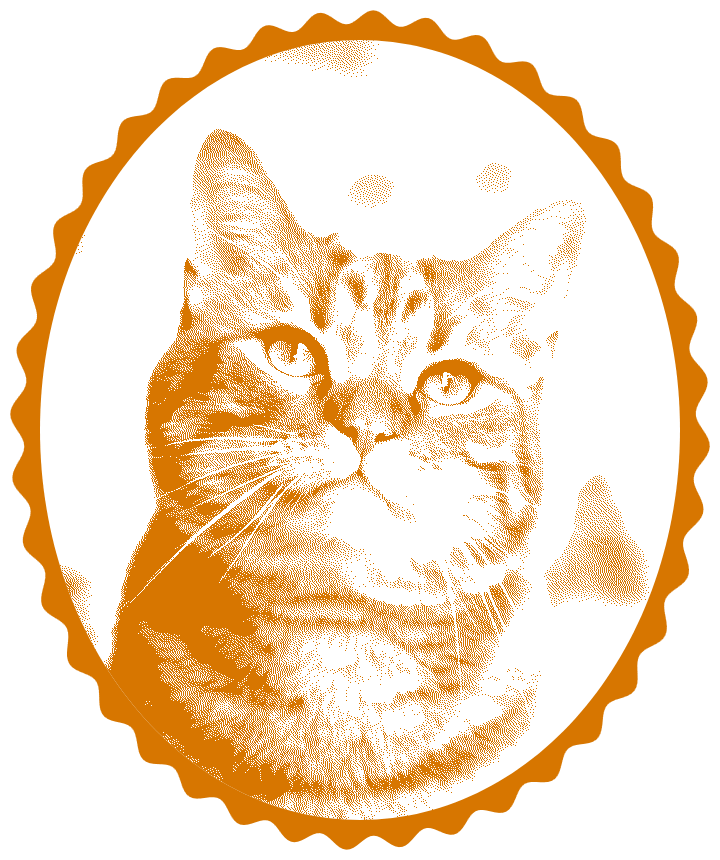
In this example, we show how to generate a highly detailed digital stamp of our beloved orange cat. We upload a JPG picture of the cat and convert it into a circular PNG stamp with a wavy 30-pixel border. To make the texture look exceptionally detailed, we enable the dithering effect using the Sierra Lite algorithm. This algorithm gives the stamp individual pixel shading. We also add a margin of 10 pixels around the stamp and select a dark orange color for the imprint. This stamp design works great for fun projects like pet scrapbooks and stickers. (Source: Pexels.)
Edit a PNG in your browser.
Compare two or more PNG images.
Convert a PNG image to an AV1 image (AVIF).
Convert an AV1 image (AVIF) to a PNG image.
Convert a PNG image to a High Efficiency Image File (HEIF).
Convert a Hide Efficiency Image File (HEIF) to a PNG image.
Convert a PNG image to an ICO icon.
Convert a PNG image to a TIFF image.
Convert a TIFF image to a PNG image.
Convert a PNG image to a PIK image.
Convert a PIK image to a PNG image.
Convert a PNG image to a PPM image.
Convert a PPM image to a PNG image.
Convert a PNG image to a BPG image.
Convert a BPG image to a PNG image.
Convert a PNG image to a FLIF image.
Convert a FLIF image to a PNG image.
Convert a PNG image to a Paint.net file.
Convert a Paint.net file to a PNG image.
Convert a PNG image to a Photoshop file.
Convert a Photoshop file to a PNG image.
Convert a PNG image to an SVG image.
Convert a PNG image to an PDF document.
Convert a PDF document to a PNG image (or multiple images).
Convert a PNG image to an EPS file.
Convert an EPS file to a PNG image (or multiple images).
Convert a PNG image to a JFIF image.
Convert a JFIF image to a PNG image.
Convert a PNG image to raw RGB values.
Convert RGB values to a PNG image.
Convert a PNG image to raw BGR values.
Convert BGR values to a PNG image.
Convert a PNG image to raw RGBA values.
Convert RGBA values to a PNG image.
Convert a PNG image to raw BGRA values.
Convert BGRA values to a PNG image.
Convert multiple PNGs to a GIF animation.
Convert an APNG animation to a GIF image.
Convert a GIF animation to an APNG image.
Convert an APNG image to a Webp image.
Convert a Webp image to an APNG image.
Convert an APNG image to an MP4 video.
Convert an MP4 video to an APNG image.
Convert an APNG image to an AVI video.
Convert an AVI video to an APNG image.
Convert an APNG image to a WMV video.
Convert an WMV video to an APNG image.
Extract all frames from an APNG image.
Play a PNG animation (APNG) frame by frame.
Change the playback speed of an animated PNG (APNG).
Change how many times an animated PNG loops.
Reverse the order of frames in an animated PNG (APNG).
Created animated PNGs (APNGs) from input images.
Check if the given PNG file is an animated PNG file (APNG).
Create a sprite sheet from all animated PNG (APNG) frames.
Create an animated PNG (APNG) from a sprite sheet.
Create Excel art from a PNG image.
Break a PNG image into multiple pieces.
Generate a slideshow animation from multiple PNGs.
Generate a mosaic wall from multiple PNGs.
Convert a PNG into a hexagonal grid of pixels.
Convert a PNG into a triangular grid of pixels.
Create a Voronoi diagram from a PNG image.
Darken PNG corners compared to its center.
Create multiple reflections of a PNG.
Apply a Bayer filter on a PNG.
Make a PNG look like it was taken via night vision goggles.
Make a PNG look like it's spherical.
Run a PNG through the Mobius Transform.
Convert between RGB, CMYK, HSV, and HSL color spaces.
Convert between 8-bit, 16-bit, 24-bit, and 32-bit PNG depths.
Remove dithering from a PNG image.
Convert a PNG to an ASCII art image.
Convert ASCII art to a PNG image.
Convert a PNG to an ANSI art image.
Convert ANSI art to a PNG image.
Convert a PNG to a Braille art image.
Convert Braille art to a PNG image.
Increase the quality of a PNG image.
Extract a 2d slice from a PNG.
Create a PNG that contains all possible RGB colors.
Find all textual information in a PNG image and extract it.
Given any 2D PNG, add 3rd dimension to it.
Quickly erase text (labels, captions) from a PNG.
Quickly delete a watermark from a PNG.
Salvage a PNG that has bad bytes in it and doesn't open.
Conceal a secret message in a PNG image.
Update meta data of a PNG file.
Delete meta data from a PNG picture.
Check if the given file is a valid PNG without errors.
Subscribe to our updates. We'll let you know when we release new tools and features, and when we organize online workshops.
Enter your email here
We're Browserling — a friendly and fun cross-browser testing company powered by alien technology. At Browserling we love to make people's lives easier, so we created this collection of online PNG tools. We created the simplest possible user interface for our tools and they are now used by millions of users every month. Behind the scenes, our online PNG tools are actually powered by our web developer tools that we created over the last couple of years. Check them out!